Authentication with Ember and Firebase - A Newbie Friendly Guide (Part 1 of 2)
Goal: Learn authentication using Firebase and Ember
Time: 2 hours
Last Updated: 2nd December 2015
Who This Guide is For
This guide is for you if you are an Ember newbie. Keep in mind though that you need to have at least built a simple project with Ember in order to derive value from this tutorial. An example of a simple starter project is this To Do list tutorial by Andy Brown.
This guide also assumes that you’ve got a Firebase account. Firebase is a platform from Google which takes case of data storage, user authentication, static hosting, and more. You can sign up and start building your app with Firebase for free.
If you’ve been working with Ember for some time now, you may find this article rather basic. If this is the case, do take a moment to skim through this post and please provide feedback in the comments.
How This Tutorial is Structured
We will build a simple ember application that connects to a Firebase backend. Then we will set up authentication using two different authorization libraries and we will learn how to switch from one library to another:
Note that these are both independent libraries and you can choose either of them for your project. In this tutorial we will actually play with both so that you can see what’s happening under the hood and learn how to swap one out for the other if the need ever arises.
This is how our authentication will flow:
- User supplies email and password.
- This is sent by our authentication library (Ember Simple Auth or Torii) to Firebase which is an authenticator.
- Once the user is authorized, Firebase will send back a token
- Using this, our authentication library maintains the session across multiple browser instances.
After that quick overview of authentication, we will go a little further and see how to connect authentication data with user data in Firebase. Then we will set up security on our Firebase table.
To recap, these are the steps of our authentication explorations today:
- Setup a simple ember project
- Setup ember-simple-auth
- Remove ember-simple-auth and setup Torii authentication
Now let’s get started!
Step 1: Setup a Simple Ember Project
Type the following command in your terminal:
ember new my-auth-testNow in this app, we will have just two routes. One is the application route which will contain the login and logout buttons. The other is the ‘protected’ route which can be accessed only if the user is logged in.
Let’s create the application route. To do this, cd into the my-auth-test directory and do:
ember g route application(Note: You will be asked if you want to overwrite the application template. Just say no for this by selecting ‘n’.)
And the protected route.
ember g route protectedRun this command in order to install the official Ember Data adapter for Firebase .
ember install emberfireLet’s take a moment to go into our Firebase dashboard and create a new test app. In your Firebase dashboard, click on “Manage App” for the test app that you’ve created. Then copy the URL of your app. Mine looks like this: “https://my-test-app.firebaseio.com/”
Next go back into your application and open the config/environment.js file. There, replace the placeholder URL - ‘https://YOUR-FIREBASE-NAME.firebaseio.com/’ with your copied Firebase URL.
We need to do this in order to use the Email and Authentication feature from Firebase.
Note that when using Firebase we don’t store passwords in our Firebase data store. Rather, we use the specialized Email and Authentication part of the Firebase application which takes care of securely storing our passwords using bcrypt.
If you are considering storing passwords on your own, it would be helpful to read through this guide.
Continuing with our tutorial … in your Firebase dashboard, click on ‘Login & Auth’ then check the box ‘ Enable Email & Password Authentication’. Then scroll down a little until you come to the ‘Registered Users’ section. Click on the ‘Add User’ button on the right. Then add an email and password. What we’re doing here is to manually create a user whom we’re going to authenticate from our application.
Okay! We’re done with basic setup and can now continue with our authentication experiments.
Step 2: Setup Ember Simple Auth Authentication
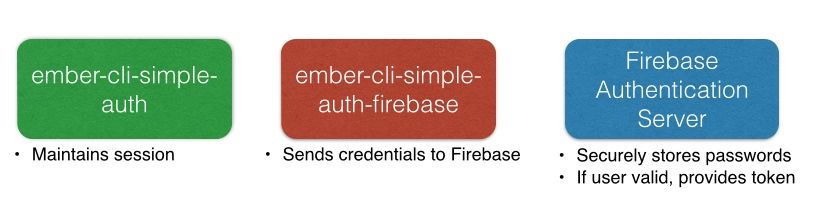
So, we’ve got an application where we’re going to collect a user’s email and password. And we’ve got a user authentication service from Firebase which will tell us if a particular email & password combination is valid or not. But how do we connect our application with the Firebase authorization service? And how do we maintain session information for a user when he moves from page to page of our application?
Enter Ember Simple Auth from Simplabs - a third party Ember addon. In addition, we also need an authenticator to talk to Firebase. For this, we use an add on called ‘ember-cli-simple-auth-firebase’. This simplified diagram may help you better understand how the pieces fit:
To install, simply run the following command:
ember install ember-cli-simple-authfollowed by:
ember install ember-cli-simple-auth-firebaseNow that we’ve wired up our infrastructure, we can write our authentication code.
Put this in your application route (app/routes/application.js):
import Ember from 'ember';

export default Ember.Route.extend({
  actions: {
       login: function() {
         var controller = this.get('controller');
         var email = controller.get('userEmail');
         var password = controller.get('userPassword');
           this.get('session').authenticate('authenticator:firebase', {
               'email': email,
               'password': password
           }).then(function() {
               this.transitionTo('protected');
           }.bind(this));
       },
       logout: function() {
           this.get('session').invalidate().then(function() {
               this.transitionTo('application');
           }.bind(this));
       }
   }
});
and this in your application template (app/templates/application.hbs):
<h2 id="title">Authentication Starter Project</h2>
{{#if session.isAuthenticated}}
   <button {{action 'logout'}}>Logout</button>
 {{else}}
   {{input type="text" value=userEmail placeholder="Email"}}<br>
   {{input type="password" value=userPassword placeholder="Password"}}<br>
   <button {{action "login"}}> Login </button>
 {{/if}}
{{outlet}}
Next, we ensure that a user attempting to access our protected route will be redirected to the application page. We do this in the beforeModel hook of the protected route (app/routes/protected.js) like this:
import Ember from 'ember';

export default Ember.Route.extend({
  beforeModel: function(){
    console.log(this.get('session'));
    if(!this.get('session.isAuthenticated')){
      this.transitionTo('application');
    }
  }
});
And we add some protected content that only logged in users can see in our ‘protected’ template. (app/templates/protected.hbs).
<p>This is our protected content which can only be seen by logged in users.</p>Now you should be able to login with the email-password combo that you created earlier inside the Firebase interface. If you try to go to the protected route (http://localhost:4200/protected), you will be redirected back to the application route.
You can also explore the session object by going into your Chrome developer console > Resources > Local Storage.

Congratulations. We’re now done with Step 2.
Step 3: Remove Ember Simple Auth and Add the Torii Authenticator
At this point, you may be wondering why we need to remove something that we’ve installed so painstakingly.
We’re doing this because it helps us to better understand how to swap out an authentication module if it ever becomes unsupported or incompatible with your future Ember environment.
Here are the steps to remove ember-simple-auth and related dependencies:
- Go in to your package.json and remove the following lines:
    "ember-cli-simple-auth": "0.8.0",
    "ember-cli-simple-auth-firebase": "1.0.5"
Also check your bower.json file and remove other lines related to Ember Simple Auth.
- Remove your node_modules and bower_components folders by running the following commands in your command line:
rm -rf node_modules
rm -rf bower_components- Next reinstall your bower_components and node_modules with the following commands:
npm install
bower install
Now that we’ve removed our dependencies, let’s install the Torii adapter like this:
ember install toriiThen we go into our config/environment.js and add in this line just below our firebase URL:
    firebase: 'https://YOUR-FIREBASE-NAME.firebaseio.com/',
    torii: {
      sessionServiceName: 'session'
    }
Next, in your applications ‘app’ folder, create another folder called ‘torii-adapters’ and put a file named ‘application.js’ there. So the path for this file will be ‘app/torii-adapters/application.js’. In that application.js file, put the following code.
import Ember from 'ember';
import ToriiFirebaseAdapter from 'emberfire/torii-adapters/firebase';

export default ToriiFirebaseAdapter.extend({
  firebase: Ember.inject.service()
});
Since we’ve now switched out Ember-Simple-Auth with the Torii adapter, our methods will also change. Go back to your application route (app/routes/application.js) and change your code to make it look like this:
import Ember from 'ember';

export default Ember.Route.extend({
  actions: {
       login: function() {
         var controller = this.get('controller');
         var email = controller.get('userEmail');
         var password = controller.get('userPassword');
           this.get('session').open('firebase', {
                provider: 'password',
                email: email,
                password: password
           }).then(function() {
               this.transitionTo('protected');
           }.bind(this));
       },
       logout: function() {
           this.get('session').close().then(function() {
               this.transitionTo('application');
           }.bind(this));
       }
   }
});
You should now be able to login and logout. This time, the authentication is happening via the Torii adapter.
Part 2 - Connect Authenticated Session With User Data
If you’ve made it this far, thank you! We still have not connected the session information to our ‘user’ model in our Firebase data store. We will do this in part 2 of this tutorial.
Acknowledgement: The ‘Goal - Time - Last Updated’ format at the top of this post is inspired by Andy Brown’s fine post on getting started with Ember.